Sunday, December 26, 2010

Merry Christmas and Happy Drumming

It just wouldn't be Christmas with out some crafty gifts. This years big gift was for D's nephew. Joe is 9 and wants to take drum lessons from his wonderfully talented drummer uncle :) So for Christmas, D thought it would be a good gift to restore his first snare drum for his nephew.


Since the drum was so old, it had some massive cosmetic issues. At first thought, we were going to just sand out all the imperfections and paint. But once we removed all the hardware it looked like a harder task than anticipated.


A new idea was born and we headed to the fabric store. We picked out a fabric that was simple yet fun. Once D sanded the drum as much as he could, and took off all of the original logo plates, I used Heat'n Bond to adhere the fabric to the drum.


I have used Heat'n Bond before to adhere fabric to furniture with great success. It is a great product. You iron the thermoweb onto the fabric, peel the paper off the back and then iron the fabric to your object. This time around it was a bit harder. For what ever reason, not sure if it was the fabric or the curve of the drum, the Heat'n Bond did not quite stick to all areas. We had to use glue for some areas that would not bond (mostly around the edges).


That said, you would never know we had any problems because once D put the heads and all the hardware on the drum, it looked great. If you know D, you know that he loves "custom" stuff, so of course we had to finish the project by adding a custom "D-Rawk" patch to the front of the drum where the old logo plate use to sit. For the patch, we simply printed out his logo on iron on transfer paper for dark clothing. We ironed the transfer onto stiffened felt, and glued the felt to the front of the drum. It looked perfect!


This project was a great learning experience for both D and I. And Joe loved his gift, so all the better. Hope you all had a happy holiday and I wish you a happy new year!


Thursday, December 9, 2010

Framingham Auxiliary Police Craft Fair THIS SATURDAY!

Since the first fair was so successful, I thought I would go for round two. With this being my last fair of the year, I invite anyone in the Framingham area to come stop by and support local artists and crafters.

There will be over 100 and/or craft vendors as well as food/beverages vendors. There is also rumor that Santa will be attending the fair from 11-3.

Since the last fair, I have been crafting like crazy to ensure a good selection at this fair. Lots of accessories, magnets, pillows and more. This time around I will also be accompanied by Jacki who will be sharing my space to sell her awesome scarves. She has both knit and fabric scarves available. (PS, they look great with one of my flower clips attached!)

I am not sure where exactly I am located with in the fair yet, but stop by and browse all of the great vendors until you find me :)


Full details below:

Hope all is well with everyone, forward this on to anyone you think might enjoy the fair.

See you Saturday!
Stephanie

(i will post more pictures after the fair)

Sunday, November 7, 2010

Spin-Yo-Present!

So- this past monday was D's birthday. YAY! I am always looking for something fun to do for him... but you know... as you get older... its harder and harder to come up with new ideas.

When he turned 30- I did a whole theme of "30 presents for someone turning 30" That was a tough one... its hard to come up with 30 presents a 30 year old would like... with out going broke.

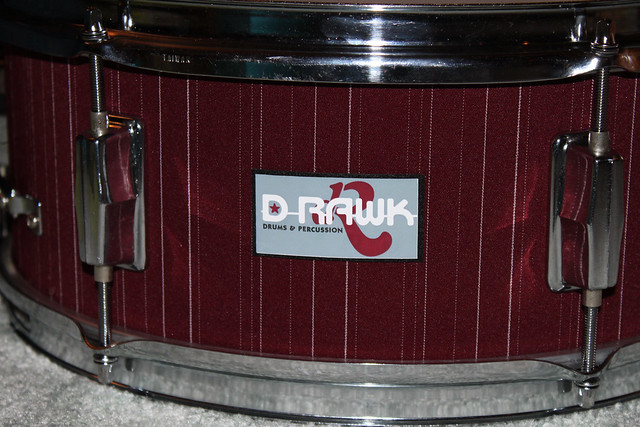
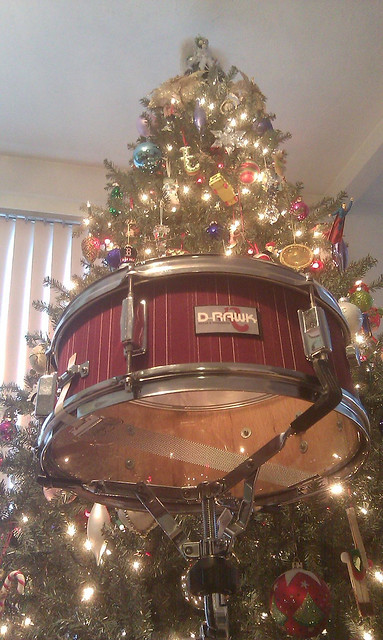
Last year, was not as exciting (for me in creative world)- although the gift itself was not lacking creativity... I designed him a new drum head for his new band. This was not the first drum head I had designed for him, so at this point... I am starting to get the hang of designing in a circle :)

And of course a shamless plug for them... if you havn't checked out Seven Shades of Grey yet, you are missing out. They have some new video on their YouTube page.


Ok ok... back to the craftyness.

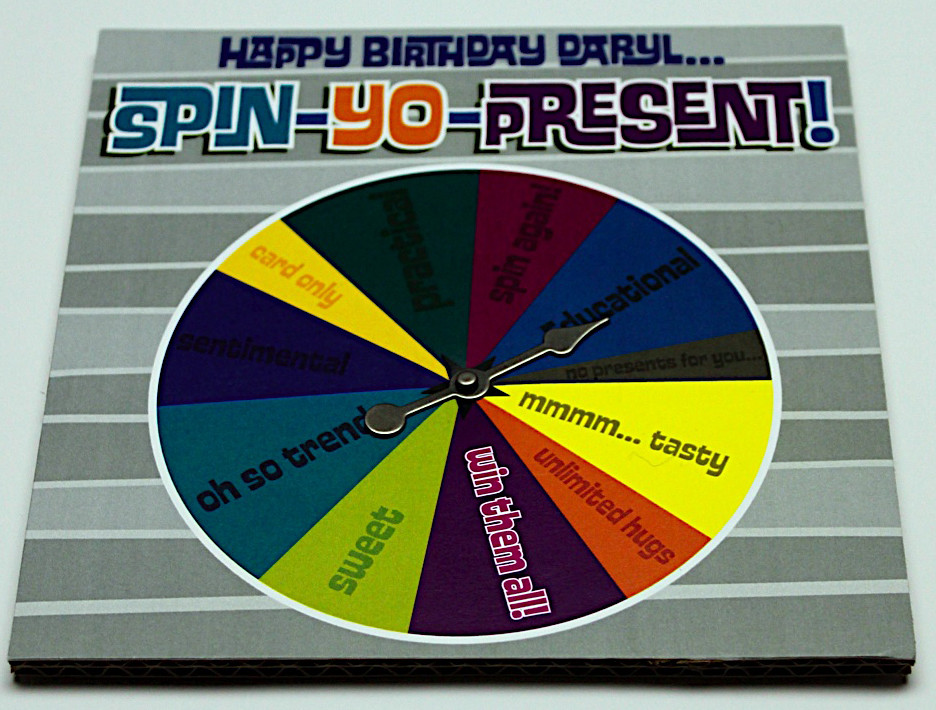
This year I decided on a game. A quick and easy game (to play... not to come up with :)


So- basically... I made a birthday present spinner. Spin-Yo-Present! The premise is... D will spin to determine what he will get for his birthday. The spinner only had describing words, so- the actual presents were still a mystery (wrapped in sushi-pack wrapping paper). If you have yet to see the sushi pack cartoon, I highly recommend it... mainly because they are sooo cute.

Little did he know that his card that he will open last will tell him that he has won all of the presents... sneaky.

I designed the wheel, and printed it out on cardstock. I then glued it to a thicker piece of cardboard (I used a side of a box I received his presents in). Once I glued it down, I trimmed the edges to a nice neat square.

Then, I added the spinner. I purchased these game piece spinners from amazon.com. The package comes with a variety of sized spinners, and matching brads to attach them. This... was the tricky part. I wasn't really thinking when I mounted the game to the thick piece of cardboard that the brad wasn't going to be long enough to poke through to the other side.... so- with some finagling, I managed to squish the cardboard down slightly in the middle and poke the brad through. I will know for next time to pick a slightly thinner piece of cardboard.


November is always a crazy birthday month. I am apparently surrounded by Scorpios. Sort of scary... But. Happy Birthday to you all anyway.
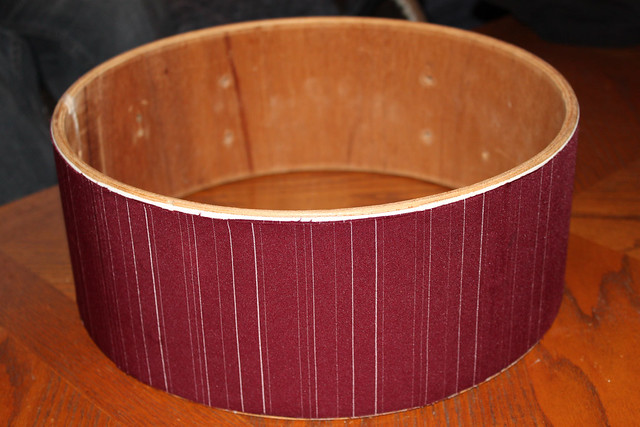
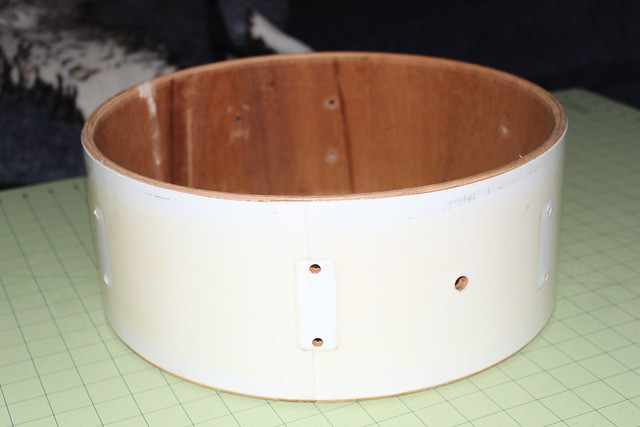
Monday, September 20, 2010

Cupcakes for a Cause

Although this post is not entirely craft related... it is for a good cause, and with my love for cupcakes... I had to share.

This week is "Cupcakes for a Cause" week. Cupcakes for a cause benefits cancer care for kids fighting the battle.


Check out their website here. It lists participating bakeries in your area to buy cupcakes and/or host a bake sale. And if you can't buy a cupcake... send a virtual one! göt2b will be donating $1 for every e-cupcake sent.


Do your part. Help out when you can. Visit http://www.cupcakesforacause.org today.


Sunday, September 19, 2010

Pirates and Weddings

So... if you were not aware. Today... September 19th, is National Talk Like a Pirate day. Naturally... with my love for all things pirate... this holiday MUST be observed.

Today was also the wedding of my friends Jen & Bob.


Clearly... the two had to connect, so check out the card I made for the wedding...

Congratulations to the happy couple... Arrrgghhh!

Tuesday, September 14, 2010

First Craft Fair... Check!

I know you have all been wondering how the fair went.... and were waiting for a post on Sunday... sorry to be a slacker blogger, but I am happy to report it went GREAT!

The day was sunny, and perfect weather for walking around. Set up was quick and easy... (thanks to all my helpers) and actually I made my first sale before I even finished (yay!) As the day went on, it got busier and busier... at one point, you couldn't fit any more people in my booth!

All in all- it was a great day and a successful craft fair. I received lots of applications for upcoming fairs in the area, and look forward to doing another one. More info on upcoming fairs in a later post... but for now, check out pictures from the fair...

Wednesday, September 1, 2010

crafty-ness exploded...

so i have been sort of hush in the blog world... but that is not to say i have not been busy. its less than two weeks till the craft fair and im getting sort of nervious. do i have enough stuff? will people like my flowers? its crazy whaat goes through your head. this is my first fair, and i don't know what to expect.

it currently looks like a craft store threw up in my living room. and thats not even counting the dining room table where my sewing machine and cutting mats are set up! which is fine for the moment, i like the crafty chaos. but as soon as the fair is over its priority one to organize all my supplies better. this way i'll be more productive. i am still dreaming of the day where i have an art studio where everything can stay set up with out being in the way... one day...

this weekend: the plan is to pull out all my finished pieces and see what still needs to be done for the fair. so stay tuned for a mini fair preview coming soon :)
Published with Blogger-droid v1.5.3.1

Friday, July 16, 2010

Awesome Artist Find: Tsai-Fi

So... I know this blog is suppose to be about MY crafty-ness and my art... but I couldn't help but share this fantastic artist I recently came across Tsai-Fi. I was browsing the products on Shana Logic and adding cute stuff to my wishlist (in case anyone reading wants to buy me presents... hint hint, nudge nudge), when I cam across an adorable necklace of an octopus with a heart shaped eye patch.

With my love for anything pirate-y and cute... I was naturally drawn and had to look up the artist for more information. Turns out ALL of her stuff is cute (but not in a so cute it makes you sick kind of way). Here are some examples of her prints.


I love paintings on wood. They just have a certain quality that really catches my attention. If you have a minute, swing over to her website or etsy shop... I will most definitely be buying prints as soon as I have a wall of my own to hang them on. For now, I will admire from a-far :)

Thursday, July 8, 2010

blog makeover

hey all-

my blog just got a little make-over. I have been all about the color grey lately and so it seemed fitting to add it to my blog.


and speaking of grey... have you checked out this awesome band seven shades of grey? If you haven't... its time :)

more crafty-ness soon....

Sunday, July 4, 2010

blogging from the beach....

ok ok so i haven't been a very good blogger lately. but that doesn't mean i haven't been busy. its been a crazy june and now it's over.
whats been going on you ask? lots. in may i went to a wedding where i made all of my accessories....(pictures to come). it was fun and all started with a pair of shoes that i had to have :). in june i decided to sign up for my first craft fair. my application was accepted and the fair will be this september. i am looking forward to it, be need to get my craft on for next couple months so i have enough stuff to bring with me. this weekend we headed to the cape for the 4th.it is the first chance i really had to relax in a while...yet i still brought craftyness with me :) i shall keep you all updated on my craft fair progress. also...look for an etsy shop update sometime this week. happy 4th everyone.

PS...
jacki...this post was for you.


Published with Blogger-droid v1.3.9

Monday, May 10, 2010

Happy Mothers Day!

My adventure in flowers went slightly further than I had expected... but these did make great Mother's Day gifts. One for D's mom and one for my mom. They were loved by both :)


I made them multi-purpose... by putting a pin AND a clip on the backs.


I see a couple more flowers in my future.

Saturday, May 8, 2010

Fabric Flowers Part Two: Rosettes

Let me start by saying this whole obsession of learning how to make flowers started with a bag I wanted that had zipper rosettes on it....


Since I am trying to save money and all... and the cost of this bag was uber expensive... I sadly did not buy the bag... but decided instead to figure out how to make zipper rosettes. Of course finding a tutorial on the best way to do that sent me spiraling into an internet whole of finding everything on how to make every other flower EXCEPT the ones I wanted. But... that didn't seem to be a bad thing since I clearly liked the other flowers enough to basically drop what I was doing and go and buy supplies to make them. (i bought zippers to... but sadly no zipper rosettes have emerged from them yet).

ANYWAY... the flowers I did make were super cute! With all the colorful fabric I had laying around from various projects (uh hmmm... my pillow making obsession from back in the day). I decided to play around with what patterns would look good when they were all folded and twisted up.

Here's what I cam up with:


I had no idea what I was going to do with any of them... I just kept trying different fabrics until I had little pile of cute things. Hair clips? Perhaps. Bag pins? Sure. A necklace charm? maybe...

And in such convenient timing... D's twin nieces turned 10 this week. I decided to make a few into hair accessories for them. What a perfect gift.


And while I was at it... an awesome yellow flower for Jacki's cute black and white bag.... AND matching headband:


 So there it is... my adventures in flowers. Maybe someday soon I will get around to the zipper ones. We shall see...

In the meantime. You can expect to see some flower merch in my Etsy shop. Check back in the next couple weeks.

Monday, May 3, 2010

Beachy Magnet Gift Set

So I was asked to make a custom set of magnets for a gift for a friend with a beach theme. And I was pleasantly excited at how they came out so I thought I would share.

 
It was a set of 12 that I packaged nicely into a matching tin.


Like em? Check out my shop for other uber cute magnet sets. birghtandcloudy.com
Have a theme in mind but don't see it on my shop? Email me!

Wednesday, April 28, 2010

Fabric Flowers Part 1.5

So I know I said that I would be working on different kinds of flowers.... but upon showing off the flowers in the previous post I got a request. I love requests, so naturally I had to fulfill....

The request was for one dozen pink flowers for a team of walkers to wear during the Avon Walk for breast cancer. Something to make the team feel unified and stand out.

They came out great!

Each flower had a snap clip attached to the back so the walkers could either put it in their hair or attach to their clothing if they'd rather. I forgot to take pictures of the backs... next time.

WHAT I LEARNED:
The second time around, I did not use a candle. I used a lighter... and I think the result speaks for itself. The lighter was much easier to control and I didn't have any random brown burn spots on the edges. Going forward, I will definitely use this technique. I also added more layers of petals to make the flowers look fuller.

At some point this weekend, I will finish my flower rosettes. Post coming soon.

Monday, April 19, 2010

Fabric Flowers Part One

lSo I got inspired when I saw this tutorial on Sew4Home on how to make organza flowers. I thought, "I could do that." So as my busy-ness continued and getting my shop up and running, I had it in the back of my mind that I wanted to try this, but didn't have a chance to do so until now. And so I began my flower making journey...


Tiny mixing bowls make great circle templates.


Took a tip from Erin Bassett and used a scented candle to mask the smell of the burning petals. She has a pretty good video demonstration of how to burn the edges of these flowers. Check it out here.


This is the stage where D said it looked like a mound of colorful jellyfish...


Slightly harder than I had anticipated, I managed to come up with some pretty cute flowers. Instead of beads for the center, I used glass marbles. Could of used a couple more layers of petals though... next time :)


My adventure in flower making will continue with fabric rosettes. Stay tuned for part two... coming soon.

Sunday, April 11, 2010

Its Official... Etsy Shop is up and running


I said to stay tuned... took a little longer than I expected... but my Etsy shop is officially up and running. Currently only displaying magnets for sale, but keep checking back for new crafty-ness :)

Sunday, March 14, 2010

Magnet Update

Hey All-

I've been working hard on my magnet project. I hope to reach 200 magnets by the end of the week. Stay tuned for pictures and a complete re-vamp of my etsy shop.

Sunday, February 21, 2010

New Find

So. Since I am adamant about getting my magnets up on Etsy by the end of March, I started to work on them this weekend. I decided once I started that it would be great to have a surface to work on that was like a great, so i could glue both sides with out worrying about them sticking. Usually, I end up with bits of newspaper stuck to either the edge, or the back of my magnets.

I figured a baking rack would be just what I needed. So D and I took a trip to Target. Found a baking rack, but it wasn't exactly what I wanted. I was hoping for something that had smaller wire... and I couldn't describe what I wanted clearly... so we started walking around the store. D kept picking up everything that was "grid like" or was a rack to anything. Then we got to the grill section. Piled up along the shelves were fireplace screens all on clearance. D pulls one out... and YES... exactly the screen i was looking for. Of course... it appeared huge compaired to the small baking rack I was holding... but oddly enough it was cheaper. So... to save money and get the surface I wanted... I went with the fireplace rack. It worked out better than I could ever imagine. I can spary and glue with out worrying that it will get completely stuck to the surface.


Once I have an appropraite work space... I will be able to unfold this fully.... Then there is no stopping me :)

Stay tuned for an update on my magnet process.

Tuesday, January 19, 2010

Fabric Covered Bulletin Board

So... on a complete whim... I decided I needed another bulletin board. With no intentions of being crafty (except to maybe paint it from its dull cork and fake wood color).... I ended up with this:


How you ask? I had an urge to go through my fabric bin. What I found was this duvet cover I had bought at Ikea about a year ago from the "as is" bin due to a small hole in the corner. It was $1.98 for a twin duvet, and I thought it was cute.... and for that price you can't buy that much fabric!

Once I found the fabric, I thought to myself, I would cover the board with batten, and ribbon and make a french bulletin board like one i have previously made:


Yes... my mind switched directions yet again, like it often does and I pulled out my sewing machine. I cut the piece of fabric the size of the board, and sewed pockets on using some scraps I had found in my bin.


 Once I was finished, I sprayed the edges of the bulletin board with black spray paint. Forgetting that I live in Massachusetts, I thought to myself... "yes if i spray this outside, it will dry in no time" 2 hours later.... it was still tacky because it was so uber cold out. Hello- It's January. Another hour drying inside, a few touch ups and a quick brush over with my blow dryer later... I was ready to apply the fabric. I sprayed the cork with spray adhesive. I used Elmer's Craft Bond, which is not usually my first choice of spray adhesive, but I was quite pleased with it. Anyway... I sprayed the cork, smoothed out the fabric over it and was almost done.

Now, because this project was a complete whim... I didn't think about the edges of the fabric. Good thing I seem to have an over abundance of ribbon left over from previous projects. I glued the ribbon around the edge and voila... I was done.

Of course my mother walked into the house just as I finished and now "has to have one" so I may be re-attempting this project in the near future. This time with a little better planning.


Oh well... sometimes you just have to let creativity take over.
You never know what you are going to end up with.

Sunday, January 10, 2010

Band Shirts

I have to say, I am loving my Yudu. I wish I had a better work space for it, but I wish I had a better work space for everything I do. In case you do not know me, I have currently moved home to my mothers house to save some money. Good plan... yes, but there is a serious lack of work space. I currently have all of my supplies in huge bins, all stacked on top of each other, and am working in the basement on a table that is too small. The day I have my own studio space will be a very happy one. Anyway... to the point :)

D's band, Seven Shades of Grey had a big show on Saturday January 2nd (which also by the way was the night I celebrated my birthday). We thought it would get a little crafty and make shirts to sell at the show. The silver Yudu ink worked GREAT! It was so crisp on the black shirts. My only grievance was that the little specs of glitter in the ink got everywhere.


That said, I made 40 shirts. What I learned this time around was that it takes a little bit of time to carefully remove each shirt from the platen. About half way through, I realized I could insert a hanger into the shirt while it was on the platen, for easy removal. I also learned that you need to work slightly quick. I had to rinse and dry my screen in the middle of printing because some of the ink had dried and my stencil was not as crisp as the beginning shirts. All in all, I think the shirts came out pretty good.


The shirts were a hit. If you have not done so already... check out Seven Shades of Grey. Awesome sounds for your listening pleasure :)